A couple of things strike me about this month. First, it was Solo Tabletop Gaming Month. Oops. Second, I have been too busy to get much solo gaming activity of any kind done this month. That was also another surprise.
Tonight brought me a few hours of free time. So I thought I'd get in some solo tabletop gaming in before the month closed. Letting a month dedicated to solo gaming go by without an update would be a shame for a blog named "Solosaurus!" To that end, I broke out 5150:Star Army and gave it a whirl.
Though I got 15mm figures for this game, I still have no terrain in that scale. So I looked to the next best thing which were my 28mm 40K figures. Rather than use the 5150:SA rules straight up, I went with the excellent and well done 4D Kay conversion for 5150. This allowed me to use 5150:SA rules with 40K armies, complete with their stats and special abilities. It's not a straight up 40K game, but I was surprised at how well it adapted to 5150. I had to do some tweaking of the 4D Kay project, simply because it was based on old 5150 rules and old 40K stats. It took all of 30 minutes to do that. Then I was on my way.
I pitted my Tau against my teeny-tiny collection of Sisters of Battle (SoB). The SoB stat lines were easy to convert. Even their Faith powers converted pretty well with the 5150 system. The 4D Kay project doesn't have anything for SoB. But I gave them Exo armor, used the Space Marine bolter stats, and they were ready. The SoB acted like Star Army troopers. The Tau were basically all done and I just printed off their stats. I treated them like Hishen for reaction purposes.
You'll notice that there are no pictures of the battle. For whatever reason, the few pictures I took didn't come out. The camera setting dial was on something other than what I usually use. Therefore, the pictures came so washed out as to be unusable. I didn't check them as I went. So now you'll have to put up with words only!
This was my first game in a campaign. So Patrol was the first mission. My Sisters walk onto the board. The enemy ends up being in an open field, 11 fire warriors with a single gun drone. I quickly realized that the 4D Kay project really overstated the pulse rifle's power. At 36" range and three shots and punishing AP power, my SoB started to evaporate as soon as they came into the Tau's sights.
I pulled my Tau codex and looked at the original stats. I fixed the pulse rifle to be more in line with the 40K stats and things became more even handed. The Sisters Acts of Faith really helped. I got to re-roll any miss results of 1 when shooting. It helped even up things. Basically, the SoB had to close the range gap the Tau enjoyed. They did this by forcing the Tau to go prone (which prevents them from firing back). When this happened the incredible Exo armor move of 16" got the Sisters right into rapid fire range. (I treated SoB like Star Army Troopers. So they enjoyed some benefits that a SoB army in 40K would not have, like this enormous move distance.)
I lost two Sisters on the way in, one Obviously Dead and one Out of the Fight. But I mopped up the Tau squad and cleared out the other Possible Enemy Forces (PEFs) without further event. I figured I should call it right there. But I read the mission objectives again. Patrol missions require you to spend one turn in each of the three enemy table sections, and then exit the table from your own board edge. That changes things a bit.
Random events started to plague me. A Tau sniper appeared, took his shot, and disappeared. Thankfully he missed. Another sniper repeated the process (or was it the same one?). Then my leader stepped on an anti-personnel mine. Only her Exo armor prevented her and the nearby Sisters from being blown to bits. Then as the Sisters were trekking back to their table edge, I rolled up random reinforcement result for the Tau. More random placement put them behind a hill at the center of the table. Another full squad of Tau Fire Warriors with two gun drones blocked my path.
In-sight tests from the Tau saw them shoot down one SoB with an OOF result. Another Sister was merely stunned, but that silenced her bolter for a round. The Sisters passed their reaction tests and fired back, killing a few and causing the Tau to duck back. But now the Sisters swooped into rapid fire range. The remaining Tau squad went down in a hail of bolter fire. The Sisters were close to their table edge now. Once half the squad was off the table, I rolled another reinforcement result! But it was in favor of the Sisters. The SoB leader declined the help at this late stage, and the rest of the SoB filed off the board with their intelligence gathering mission a success.
So it was an exciting game. I really enjoy the complete surprise of revealing PEFs or the random arrival of of the enemy. This is something that just can't be had in a conventional game. I really only played with the 4D Kay conversion since I had the figures for it and was curious as to how it worked. But it went so well and a narrative developed so smoothly from the rules, I think I'll continue in this vein. I have more Sisters of Battle on the way, and a lot more figures that can be used for 5150:SA. I'll definitely be continuing and coming up with a little story behind this conflict!
Showing posts with label Battle Report. Show all posts
Showing posts with label Battle Report. Show all posts
Saturday, November 26, 2011

Sunday, September 25, 2011
Nuts! Battle Report
I'm going to try out a post on solo miniature games today. If you enjoy miniature games, Two Hour Wargames puts out some nice stuff that is actually made for solo play. I really enjoy WWII as a miniature games setting, and so have been playing the game Nuts! on and off for a while. Pros and Cons abound, as you can expect in such a game. The biggest pro is that it is made with solo gaming in mind, and as such has your "non player" side very well covered. Also, there's little bookkeeping beyond noting what status a model might be in. On the con side, the rules are disorganized and the reaction system takes a lot of getting used to it before it becomes enjoyable. I also wouldn't call Nuts! a "rules light" system.
Having said all that, I've come to enjoy Nuts! as a solo game. Once you "crack the code" you realize the game isn't all that hard to play and most of the stuff you can keep in your head. Rather than talk on about it, I'll just give you a battle report to review.
This is a Recon Patrol mission, where I have to scout every section of the board. The board is divided into nine equal squares, and I have to move my troops through each one. I'll be playing US Rangers, and the non player (NP) side will be German infantry. The terrain set up is randomly generated. Next I place three Possible Enemy Forces (PEF) at randomly determined spots. These PEFs may or may not turn out to be actual German enemy forces. I will have to roll on a contact table to see if something is really there, and then roll up what it actually is. I make the same rolls for any terrain feature to which I have LOS.
Some things to know about the mission are 1) the Enemy Activity Level (EAL) is 3 (out of six), which means I have a 50/50 chance of finding the enemy when I roll for contact, and, 2) the Support Level (SL) is 1, which means if I get a chance for reinforcements, I have to roll SL or less to have them show up. So the US is highly unlikely to get any help.
Here's the table set up with the PEFs clearly marked and US forces deployed. I'm playing on a 4'x4' board.
 The rules state that a PEF should be placed out of LOS if possible. So two of them are completely out of sight. The last one is in the only open "square" and is just placed in the center. Here's a better shot of it in relation to the US Rangers coming on the board.
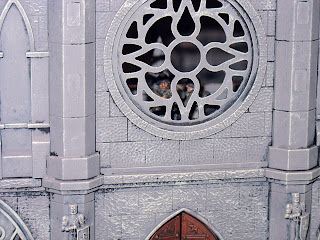
 So you can see that the US Rangers have LOS to not only the PEF but also the woods, the church in front of them, as well as two building and a hill (off camera) to their left. I have to roll to scout each of these, comparing the EAL to my dice roll. If get contacts, then I have to roll up what these are. So the US comes on the board, moves 2" in and comes into LOS of the first PEF. So I decide to make all my checks now.
It's going to be a hard fight for the US Rangers, as they are in the open and have discovered that they have enemies everywhere! I roll up a "rest of the platoon" result for the PEF, which means since there's nothing yet on the board I will place an entire platoon of infantry where the PEF is. Ouch! The woods reveals that there is an additional squad of Germans hiding there as well. If that's not bad enough, a MMG team is in the church directly across from me. Yikes!
Here are some pictures of the enemy. I couldn't get them all in the picture, there were so many.

 So as it's my activation, all these new enemies get to take In Sight tests to see what they do. To make it easy on myself, I make them all Rep 4. By contrast my Rangers are all rep 5, and the leader is Rep 6. Rep is a measure of how good someone is, with 1 being the worst and 6 being the best. Rangers are elite, and so have higher chances to be higher Rep. But I digress.
The Germans decide to open fire. The first shot rings out and takes the Rep 6 Ranger leader out of the fight! This causes an immediate Leader Lost test. The Rangers only pass one of two dice, and so split both ways looking for cover. One group jumps into the ruined building on the left and the other hides in the woods on the right. I played this whole part wrong, which had profound implications for the game. I should have resolved all German shooting first and then did all the tests. But instead as soon as the leader dropped I did the test. This put everyone into cover. In reality the Rangers should've been blown to bits before they could get anywhere!
Now that all the Rangers had ducked back behind cover, it became harder to hit them. Once you are shot at, either when active or not, you can take reactive fire. Rep figures into this, and at Rep5 and the targets being in the open, the US Rangers were extremely effective in killing the enemy. By the end of the Rangers first round, the Germans were running for cover and dragging their injured with them.
The Germans activated next, and the PEFs had a chance to move. There were only two now, and they activate and move randomly. One stayed in place and another PEF moved from behind the church to join the other PEF at the rear. It was like they knew things weren't going well up front! Germans tried to fire from cover but couldn't bring numbers to bear. Return fire from the Rangers was deadly accurate. I tried to have Germans lob grenades, but they couldn't prepare them in time. They would be killed before the next activation when they could throw them!
This went back and forth, with US Rangers having no trouble preparing grenades and tossing them on the same turn. That's the difference between Rep 5 and Rep 4 models! Because the Germans bunched up trying to find cover, they got plastered in the 5" blast radius. One brave Ranger rushed to the church window and threw in a grenade that blew up the MMG team that had pulled back from it's sniping perch. Here's a shot of it in action.
 By the end of the second turn the Germans had lost a lot of men, while the Rangers were just down by their leader only. I use the metal yardstick to show my "board edge." Those Germans are all casualties.
 From here on it was a mopping up action. The Rangers filtered into the church to get a view of the second PEF. It turned out to be another infantry squad. I had a Ranger with a grenade launcher inside. So he readied a grenade and fired into the bunched up Germans. Boom! The squad pretty much disintegrated. I think I unconsciously aided this disaster for the Germans. I shouldn't have placed the PEF forces so close together. If they had been better spaced, the all wouldn't have died so easily. I've got to remember that going forward, because I keep doing it. That makes it too easy for one grenade or blast weapon to kill entire squads.
The Germans for their part were constantly retreating. They never could get a grenade throw without the person holding it being killed first. I've read in another THW game (5150 Star Army) that if a model with a readied grenade is killed before he can toss it, it goes off right then. Had that rule been in place during this game, the Germans would've killed themselves.
So as the Rangers push forward, one Ranger moves up to contact the remnants of a rifle squad that is hunkered down. Being contacted in this state means that the hunkered down models will surrender to enemies who come within 4". So rather than shoot at the team (which actually can't be seen while in this status unless you go prone), it's easier to double move up. One Ranger captured a group of four enemy and took them out of the fight. I use the fiery blast marker to show hunkered down status.

So now only one PEF remains unresolved. Each PEF has its own REP, and this particular one was REP 1. This means it can only activate on an initiative roll of 1; so it didn't move all game. Because I didn't actually know what it was, I hadto approach it carefully. This became the highlight of the game for me. I could be looking at another entire rifle platoon hidden in the corner, kept in reserve until the last minute. I didn't know until one of my men drew LOS. So I gave one soldier the difficult task of checking out what was behind the wall as the rest of the team closed in. I still had Rangers in the church, who would be unable to help if something big popped up.
 The brave soldier peaked around the corner. I rolled on the contact charts. Nothing there! Just a case of the nerves, I guess! Whew! Game over and the US Rangers pushed away an entire German rifle platoon while only taking one casualty. During the course of the game, I moved through every square and scouted every terrain piece. Nothing else was found, and the sector was cleared.
So that's a game of Nuts! for you. If you enjoy solo games, you should check out this system.
Having said all that, I've come to enjoy Nuts! as a solo game. Once you "crack the code" you realize the game isn't all that hard to play and most of the stuff you can keep in your head. Rather than talk on about it, I'll just give you a battle report to review.
This is a Recon Patrol mission, where I have to scout every section of the board. The board is divided into nine equal squares, and I have to move my troops through each one. I'll be playing US Rangers, and the non player (NP) side will be German infantry. The terrain set up is randomly generated. Next I place three Possible Enemy Forces (PEF) at randomly determined spots. These PEFs may or may not turn out to be actual German enemy forces. I will have to roll on a contact table to see if something is really there, and then roll up what it actually is. I make the same rolls for any terrain feature to which I have LOS.
Some things to know about the mission are 1) the Enemy Activity Level (EAL) is 3 (out of six), which means I have a 50/50 chance of finding the enemy when I roll for contact, and, 2) the Support Level (SL) is 1, which means if I get a chance for reinforcements, I have to roll SL or less to have them show up. So the US is highly unlikely to get any help.
Here's the table set up with the PEFs clearly marked and US forces deployed. I'm playing on a 4'x4' board.


It's going to be a hard fight for the US Rangers, as they are in the open and have discovered that they have enemies everywhere! I roll up a "rest of the platoon" result for the PEF, which means since there's nothing yet on the board I will place an entire platoon of infantry where the PEF is. Ouch! The woods reveals that there is an additional squad of Germans hiding there as well. If that's not bad enough, a MMG team is in the church directly across from me. Yikes!
Here are some pictures of the enemy. I couldn't get them all in the picture, there were so many.


The Germans decide to open fire. The first shot rings out and takes the Rep 6 Ranger leader out of the fight! This causes an immediate Leader Lost test. The Rangers only pass one of two dice, and so split both ways looking for cover. One group jumps into the ruined building on the left and the other hides in the woods on the right. I played this whole part wrong, which had profound implications for the game. I should have resolved all German shooting first and then did all the tests. But instead as soon as the leader dropped I did the test. This put everyone into cover. In reality the Rangers should've been blown to bits before they could get anywhere!
Now that all the Rangers had ducked back behind cover, it became harder to hit them. Once you are shot at, either when active or not, you can take reactive fire. Rep figures into this, and at Rep5 and the targets being in the open, the US Rangers were extremely effective in killing the enemy. By the end of the Rangers first round, the Germans were running for cover and dragging their injured with them.
The Germans activated next, and the PEFs had a chance to move. There were only two now, and they activate and move randomly. One stayed in place and another PEF moved from behind the church to join the other PEF at the rear. It was like they knew things weren't going well up front! Germans tried to fire from cover but couldn't bring numbers to bear. Return fire from the Rangers was deadly accurate. I tried to have Germans lob grenades, but they couldn't prepare them in time. They would be killed before the next activation when they could throw them!
This went back and forth, with US Rangers having no trouble preparing grenades and tossing them on the same turn. That's the difference between Rep 5 and Rep 4 models! Because the Germans bunched up trying to find cover, they got plastered in the 5" blast radius. One brave Ranger rushed to the church window and threw in a grenade that blew up the MMG team that had pulled back from it's sniping perch. Here's a shot of it in action.


The Germans for their part were constantly retreating. They never could get a grenade throw without the person holding it being killed first. I've read in another THW game (5150 Star Army) that if a model with a readied grenade is killed before he can toss it, it goes off right then. Had that rule been in place during this game, the Germans would've killed themselves.
So as the Rangers push forward, one Ranger moves up to contact the remnants of a rifle squad that is hunkered down. Being contacted in this state means that the hunkered down models will surrender to enemies who come within 4". So rather than shoot at the team (which actually can't be seen while in this status unless you go prone), it's easier to double move up. One Ranger captured a group of four enemy and took them out of the fight. I use the fiery blast marker to show hunkered down status.

So now only one PEF remains unresolved. Each PEF has its own REP, and this particular one was REP 1. This means it can only activate on an initiative roll of 1; so it didn't move all game. Because I didn't actually know what it was, I hadto approach it carefully. This became the highlight of the game for me. I could be looking at another entire rifle platoon hidden in the corner, kept in reserve until the last minute. I didn't know until one of my men drew LOS. So I gave one soldier the difficult task of checking out what was behind the wall as the rest of the team closed in. I still had Rangers in the church, who would be unable to help if something big popped up.

So that's a game of Nuts! for you. If you enjoy solo games, you should check out this system.
Subscribe to:
Posts (Atom)